✨To support my free patterns, this post includes affiliate links for materials I love. Thank you for your support! 💖
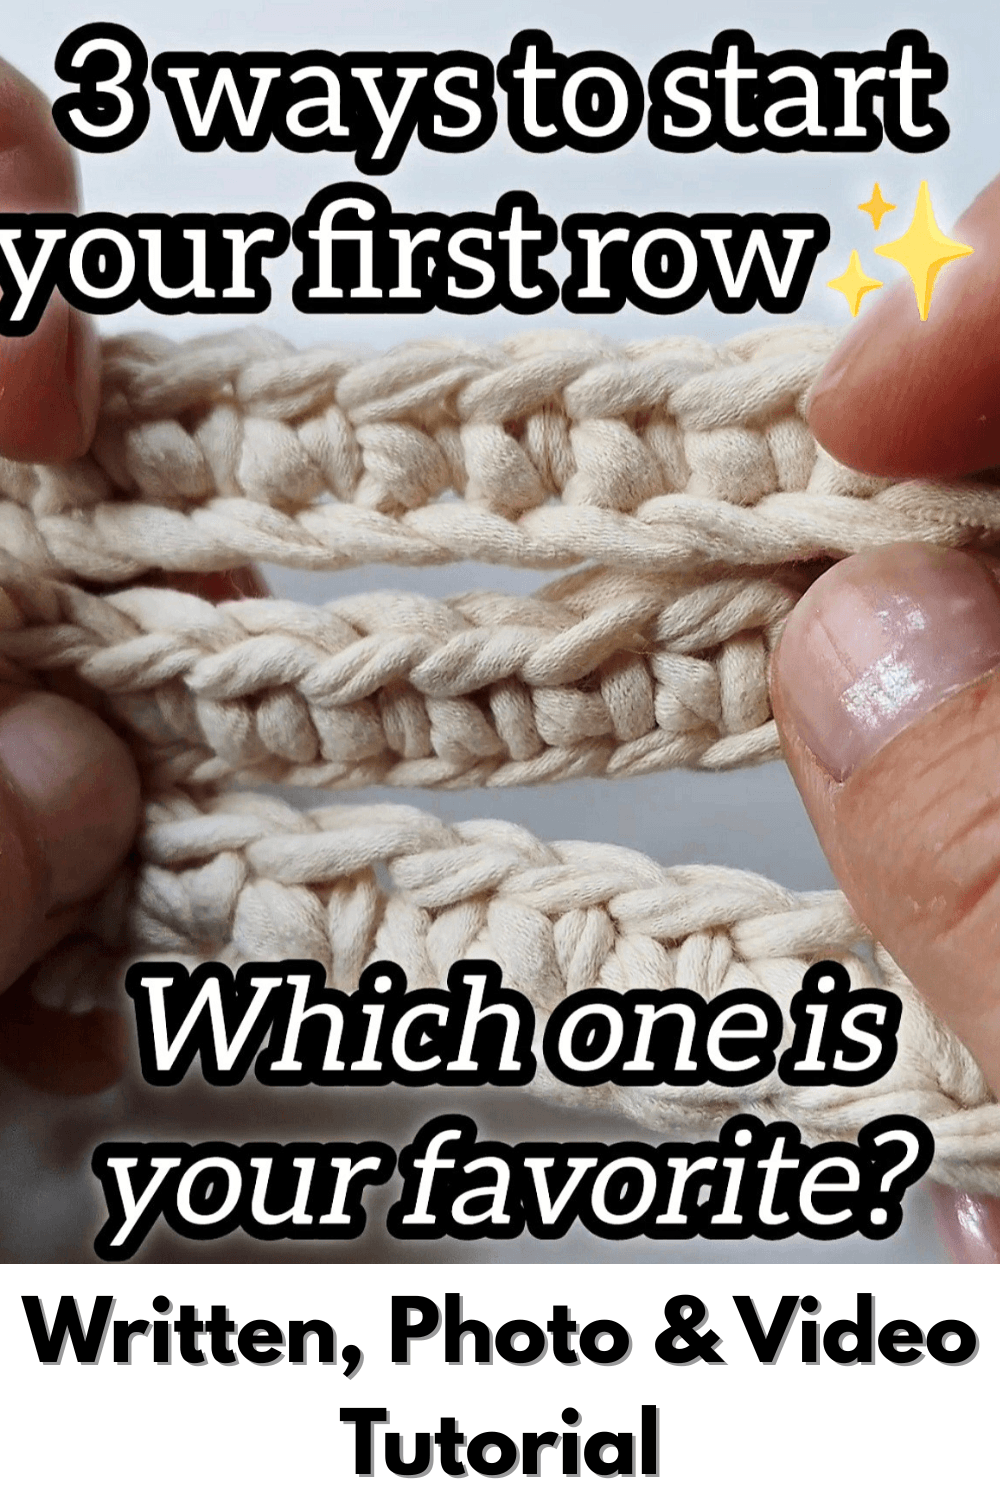
Starting a new project is always exciting, but many beginners struggle with a common frustration: how to start a crochet row without ending up with bumpy, uneven, or tight edges. The foundation of your work is the most critical step in any pattern, as it sets the tension and structure for every stitch that follows. If your starting chain is too tight, your work will curl; if it’s too loose, the bottom of your project will look messy and unprofessional.
Mastering different techniques for your foundation row is the secret to achieving a “store-bought” finish on your handmade items. Whether you are working on a delicate lace shawl or a sturdy amigurumi limb, choosing the right method can solve the most common “messy edge” problems before they even start. In this guide, we will explore three proven methods to ensure your crochet projects have clean, elastic, and beautiful borders every single time.
Just Starting Out?
If you are picking up a crochet hook for the very first time, don’t worry if these methods feel a bit advanced just yet. Before mastering the perfect edge, it’s essential to get comfortable with the absolute basics, like how to hold your yarn and create your very first stitches. I have a dedicated guide, How to Crochet Basic Stitches, which includes step-by-step video tutorials for the starting chain (ch) and the single crochet (sc). Once you’ve practiced those fundamentals, come back here to learn how to transform those basic starts into professional, clean edges!
🌸 Support My Work
Found this tutorial helpful? If you’d like to support me in creating more free crochet guides and video tutorials, you can leave a small tip here:
💖 Leave a Tip & Support EmmaS Dolls
Thank you for being part of the EmmaS Dolls community! 🧶
Method 1: The Standard Foundation Chain
The standard foundation chain is the most common way to start a crochet row, and for a good reason—it is undeniably the fastest and simplest technique for beginners. Most patterns begin with a series of chain stitches (ch) that serve as the anchor for your first row of decorative stitches. However, despite its popularity, the standard chain comes with a notorious drawback: the dreaded curling effect.
If your tension is even slightly too tight, the foundation chain will act like a drawstring, pulling the bottom of your project inward and causing the entire piece to warp or “smile.” This is especially frustrating when making blankets or scarves that need to lie perfectly flat.
To solve this, a professional trick is to use a crochet hook one size larger than what the pattern calls for, but only for the starting chain. By switching to a bigger hook for those initial stitches, you manually create more space and elasticity. Once you begin Row 1, simply switch back to your regular hook. This ensures your foundation is flexible enough to match the natural stretch of your stitches, resulting in a clean, straight edge that won’t curl or distort your hard work.
How to Start a Crochet Row by EmmaS Dolls
Method 2: Working into the Back Bump (The “Revolucija” za savršene ivice)
If you want your crochet projects to look truly professional, mastering the Back Bump method (sometimes called the “bottom bar” or “third loop”) is a total game-changer. While most beginners instinctively insert their hook into the top “V” of the foundation chain, this technique requires you to rotate the chain slightly to reveal the small bump on the back.
Why is this considered a revolution for items like scarves, blankets, and towels? Because by crocheting into the back bump, you leave the beautiful, braided “V” shape visible at the very bottom of your work. This creates a symmetrical edge that perfectly matches the top of your final row.
Aside from the aesthetic appeal, this method provides much more elasticity than the standard approach. It prevents that common “pinched” look at the start of your project and makes it significantly easier to add a border or fringe later on. Whether you are working on a cozy winter scarf or a delicate baby blanket, using the back bump ensures your foundation is as polished and flexible as the rest of your stitches. It takes a little more patience to find that bump, but the clean, “store-bought” finish is well worth the extra effort.
How to Start a Crochet Row by EmmaS Dolls
Method 3: Foundation Stitches and Crochet Cord (No-Chain Start)
For projects that require maximum durability and a professional stretch, such as amigurumi limbs or garment hemlines, the Foundation Row (also known as a chainless start) is the ultimate solution. Unlike the previous methods, this technique allows you to create your foundation chain and your first row of single or double crochet at the same time. This eliminates the risk of a tight starting chain altogether, giving your work a perfectly elastic foundation that moves with the rest of the fabric.
If you are working on specific amigurumi parts like tails, arms, or straps that need to be extra sturdy, you might prefer a Two-Strand Foundation Cord. This variation creates a thick, rounded base that holds its shape beautifully under tension.
Whether you choose a standard foundation row or a decorative cord, these techniques ensure your work starts with a clean, stable structure. For those who want a deeper dive, I have included a detailed video tutorial for the Foundation Single Crochet and Two-Strand Cord below, which is also featured in my Amigurumi Advanced Techniques guide. Mastering these “no-chain” starts will distinguish your handmade dolls and accessories from amateur projects instantly.
How to Start a Crochet Row by EmmaS Dolls
Video Guides How to Start a Crochet Row: See These Techniques in Action
For a quick overview of the three methods discussed above, watch this step-by-step breakdown:
If you are looking for an even more durable start for your amigurumi projects, check out these tutorials:
How to Start a Crochet Row by EmmaS Dolls
Choosing the right way to start your crochet row can be the difference between a project that looks handmade and one that looks “homemade.” While the standard chain is great for speed, experimenting with the back bump or foundation stitches will elevate your craft to a professional level. My personal favorite? The back bump—it’s the simplest way to get those clean, store-bought edges every time!
How to Start a Crochet Row by EmmaS Dolls
Explore My Free Crochet Patterns
Now that you’ve mastered the perfect foundation row, why not put your skills to the test with a fun new project? If you’re looking for something unique and creative, I have a collection of free patterns right here on the blog. You can dive into my Crochet Camera Pattern—perfect for photography lovers—or celebrate a special milestone with the Graduation Hat Pattern. All my website patterns are designed to be easy to follow, helping you create beautiful handmade items while practicing these professional techniques.
Get Ad-Free, Printable PDF Versions
I know many of you prefer to crochet away from the screen, whether you’re relaxing on the couch or traveling. If you’d like to support my work and enjoy a more focused crafting experience, you can find high-quality, ad-free PDF versions of my patterns in my Etsy shop and on Ravelry. These printable versions are perfectly formatted for offline use, allowing you to follow along without any digital distractions while supporting the creation of more free content here on EmmaS Dolls.
Join the EmmaS Dolls Community
Don’t miss out on the latest designs and crochet tips! I am constantly working on new free patterns and video tutorials to help you grow your skills. By signing up for my newsletter, you’ll be the first to know when a new pattern drops or when a new “how-to” guide is published. Join our growing community of makers today and let’s keep creating beautiful things together—one stitch at a time!
Pin it for Later!
How to Start a Crochet Row by EmmaS Dolls
Since this pattern is free, please help me keep it that way by not taking screenshots. Keeping the page open while you work supports my studio! Happy crocheting!✨